NPM Release Plugin (release-it) Configuration on Angular Apps
What is NPM Release Plugin
This plugin is used to release a project with npm, saving a lot of repetitive, manual work.
How to Set It Up?
All the configurations are made in the package.json file. It can be done automatically using the npm CLI.
A general package.json file looks like this.
To configure the plugin,
1. Install the `release-it` plugin by running the following command.
sahan@sahan-pc:~$ npm install — save-dev release-it2. Run the following command to add `release-it` to scripts.
sahan@sahan-pc:~$ npm init release-itSelect add to package.json when requested
This will add the release-it dependency to the devDependencies and to scripts in package.json. Check if it is added as follows.
(The version may differ)
Your package.json file should look like this after the changes
Usage
Prepare a Release
Preparing a release goes through the following release phases:
- Check that there are no uncommitted changes in the sources
- Run the project tests against the modified files to confirm everything is in working order
To prepare a release, execute the following command
sahan@sahan-pc:~$ npm run releaseThis will prompt a screen similar to the below. Select the appropriate version from the list, or manually add the new version.
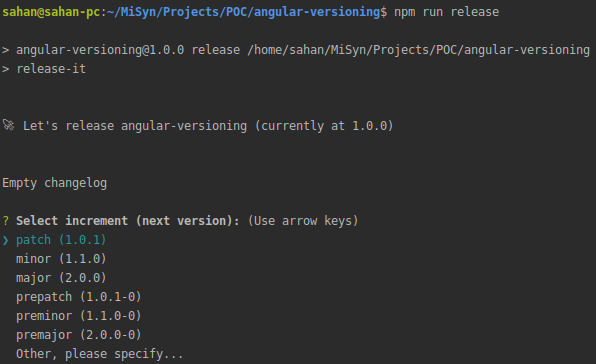
Current release version will be shown at the top
Next release version will be shown within the brackets for each type of release
Ex:
If current release version is 1.0.0, if you select,
Patch — Next release will be 1.0.1
Minor — Next release will be 1.1.0
Major — Next release will be 2.0.0
After selecting the version it will ask to Commit, Tag, and Push the release to the git. Press the enter key or type ‘Y’ and press enter for these options. Then it will ask to publish the project to npm. Enter ‘No’ in this case as we do not want the project to be published to the npm. Refer to the screenshot below.

Frequently Occurred Issues
- Uncommitted changes exist.
- All changes should be committed prior to the release
2. Tag already exists
- Another developer could release a version with the same tag name
- In such case use a new tag name to release
- The tag from the previously failed release could still exist in the repository
- In such case delete the tag manually on both local and remote repositories and continue the release
3. Failed to push the tag
- In most cases, the reason for this error is a network issue. Check your network connection.
4. Error — No upstream configured for the current branch
- Manually push the commits to the repository using the following command. (Replace the branch name accordingly)
sahan@s-pc:~$ git push — set-upstream origin masterWant to Know More?
Visit the npmjs plugin page from here.
